Thursday, November 29, 2012

Mushroom Toasts

Here is an old recipe my mom used to make for holiday appetizers.  The recipe was originally published in The Camden (ME) Herald  on December 29, 1989.   The original recipe is incredibly rich.  I've lightened it up a bit by reducing the amount of butter I used by 1/4 of a cup.  I also brushed olive oil on top of the bread instead of the butter (yes more butter) that the original recipe called for. The resulting dish is follows the less is more theory.  A single toast--or two-- will suffice since you want to make sure you save room for the main course.


MUSHROOM TOASTS


3 oz cream cheese, softened
1 small onion, finely chopped
1 cup fresh mushrooms, finely chopped
1/2 cup butter
1 Tablespoon mayonnaise
1/2 Teaspoon paprika
Olive oil
Thinly sliced bread cut into triangles or two-bite sized pieces


1)  Preheat oven to broil.


2)  Saute onions in a 1/2 cup of butter until soft.

Butter and onions

3)  Stir in mushrooms and cook until the mushrooms are soft and the liquid has evaporated.


'shrooms

4)  Stir in mayo, cream cheese, and paprika.  Stir until well blended.


After the mixture has cooked down

5)  Brush toast slices with olive oil. Add 1 teaspoon of mushroom mixture to the top of each piece of
     bread.


Oiled bread

6)  Place toasts onto a baking sheet and broil 2-3 minutes until hot and bubbly.  Serve immediately.


Ready for the Thanksgiving table

Sunday, November 25, 2012

Pancetta Braised Brussels Sprouts

Growing up I never liked Brussels sprouts.  They were always overcooked gray-green lumps sitting on my plate and taunting me to eat them.  Others might sing their praises but try as I might I just couldn't see the attraction.  Somehow I managed to avoid them for most of my adult life and I was just fine with that.  Then all of a sudden they seemed to become a trendy vegetable and they were everywhere;  all of my cooking magazines profiled the bright green piles of mini-cabbage like vegetables (in Albanian they are called little cabbages) as if they were the greatest thing around.  As I paid more attention to the recipes I was intrigued.

However, I could never seem to find a recipe that completely enthralled me so I developed my own.  What I came up with was good.  Crisp to the bite with subtle flavors of lemon, thyme and bacon (yes, everything is better with bacon) dinner guests rave about them.  Even non - Brussels sprouts eaters (a.k.a. Glenn) eat them.  As an added bonus, this dish is easy and can be made ahead of time.  I've served them both hot and at room temperature and have even been known to eat the leftovers cold right from the refrigerator.  And did I mention that they are easy to make?


PANCETTA BRAISED BRUSSELS SPROUTS

1 lb Brussels sprouts, trimmed and sliced in half lengthwise
2 Tablespoons olive oil
4 ounces pancetta, diced
1 small onion, diced in 1/4 inch cubes
2 medium carrots, diced in 1/4 inch cubes
2 Tablespoons fresh thyme, minced
Zest from one lemon
1/4 Teaspoon red chili pepper flakes- or more to taste
Salt and pepper to taste


1)  Heat the olive oil in a large heavy skillet over medium high heat.  Add the pancetta and stir 
     frequently continuing to cook until the meat begins to brown on all sides 5-7 minutes.


Pancetta, onions, and carrots cooking

2)  Add the onion and carrots and continue cooking for another 5 minutes.

3)  Add the Brussels sprouts to the pan and stir to combine.  Reduce heat to medium and continue to
      cook for 15 to 20 minutes stirring frequently to prevent the sprouts from sticking.  Add additional
      olive oil in one teaspoon increments if necessary to prevent scorching.  

4)  Cook until the Brussels sprouts are to your preferred level of doneness. They will turn a bright green
     as they continue to cook and will brown slightly on their cut sides.  I prefer mine crisp to the bite and
     a total of 20 to 25 minutes of cooking usually does the trick.

5)  Remove from the heat.  Add the thyme, lemon zest and chili pepper flakes and season with salt and 
     pepper.  Enjoy!


Ready to eat

Thursday, November 22, 2012

Chestnut, Pear, Cherry and Sage Dressing

For some Thanksgiving is all about the turkey; for me, it is all about the side dishes.  Don't get me wrong.  I love a nice juicy slice of turkey but it is everything that gets piled on the plate along with the meat that gets me the most excited.  The hardest part about living in Albania is my inability to access some of my traditional Thanksgiving (and Christmas) standbys- fresh cranberries and sweet potatoes are not available here and due to their perishability, it is not possible to get them shipped in through the pouch.  (I'm sure at some point someone has tried this but I haven't done it yet. Maybe next year........).

There are still plenty of delicious side dishes that I can make and this recipe for Chestnut, Pear, and Sage Dressing based on a recipe from Williams-Sonoma is just the first of several that I will highlight over the coming weeks.  Not only does this dish bring together some of the tasty and plentiful ingredients that are found here in Albania but it also makes good use of the roasted chestnuts I prepared earlier this week.  The original recipe calls for the inclusion of breakfast sausage.  I omit this since many of our guests do not eat pork.  I also double the recipe since leftover dressing is a vital part of any post-Thanksgiving Day turkey sandwich.


CHESTNUT, PEAR, CHERRY, AND SAGE DRESSING

1-pound loaf of rustic bread, torn into 1/2 inch pieces
1 Tablespoon unsalted butter
1 large yellow onion, cut into 1/2 inch dice
1 large carrot, cut into 1/2 inch dice
3 celery stalks, cut into 1/2 inch dice
2 small pears, cored and cut int 1/2 inch dice
1 cup peeled and chopped roasted chestnuts
1 cup dried sour cherries, chopped
1/3 cup finely chapped fresh sage
4 Tablespoons unsalted butter, melted
4 cups turkey or chicken stock
2 Tablespoons unsalted butter
Salt and freshly ground pepper to taste

1)  Spread the bread out on a baking sheet and let dry overnight.  Alternatively, toast in a 300 degree F
     oven for 30 minutes making sure the cubes do not burn.


2)  Preheat an oven to 375 degrees.  Butter a large, shallow baking dish.

3)  In a large saute pan over medium heat, melt 1 Tablespoon butter and add the onion, carrot, celery
     and pear.

Ready for the pan


4)  Saute, stirring occasionally, until tender, 7 to 8 minutes.  Transfer the mixture to a large bowl.

Melding flavors
Yummy additions

5)   Add the chestnuts, dried cherries, sage, melted butter, stock and salt and pepper and stir to mix.
      Add the bread and stir to combine.
Before the addition of the bread


4)  Transfer the dressing to the prepared baking dish and dot with butter.  Bake until golden and crispy,
      about 1 hour.

Into the oven it goes


Serves 10-12 people.


Unfortunately I didn't get a picture of the finished dressing in all of its golden goodness.  Our guests dug into the dish immediately and there weren't any leftovers. I guess this is a sign of a good dish.  I'll have to make it again and remember to get a picture next time.


Sunday, November 18, 2012

Roasted Chestnuts

Chestnuts roasting in Ljubljana
Chestnuts are a perennial autumn nut.  Wander through any European city during the fall or winter months and you can see roasting on just about every street corner.  You can easily follow their distinctive sweet fragrance to the closest vendor.  There is nothing better than eating hot roasted chestnuts from a paper cone as you roam the streets.  This time of year chestnuts are also abundant in the markets.  From chain grocery stores to neighborhood shops and the grand vegetable markets, bins of the nuts are everywhere.  Not only are chestnuts good to eat "as is" they add body and complexity to other foods.  Whether combined with roasted vegetables and bread dressing or as a main ingredient in a  soup, they add rich complexity to any dish.

Roasting chestnuts at home isn't hard but it is time consuming.  Last November in a fit of over ambitious insanity, we hosted a lunch for twelve two days before our sit down Thanksgiving dinner for twenty-four.  Thinking I could multi-task with my ingredients, I planned a chestnut apple soup for the lunch and a chestnut sage dressing for Thanksgiving dinner. Even with the able hands of my visiting parents (who for some reason haven't visited since) Glenn and I spent hours trying to pry the roasted chestnuts from their shells.  I couldn't figure out why they were being so stubborn and at that time I vowed that until we had access to shelled chestnuts I would not be including this tasty ingredient in any of my dishes.

Fast forward a year.............we are heading into Thanksgiving week and chestnuts are once again on my menu.  This year, however, my menu and guest list are saner and I have a plan.  I also did more research and I think I may have found an easier roasting and shelling method.  Chestnuts must be cooked before being eaten.  Various methods call for boiling, broiling, roasting, or grilling the nuts before shelling them.  In pure experimental mode, I used three methods for cooking my chestnuts:  grilling on the gas fired grill, broiling in the oven, and roasting in the oven.


X marks the spot

ROASTED CHESTNUTS

Regardless of which method you chose, it is necessary wash and score the nuts before cooking.  I used a small paring knife to cut a large "X" on the flat side of each nut.  Given the large quantity of nuts I had, this was a time consuming, and if one isn't careful, dangerous task.  Fortunately I only stabbed my thumb once on this go around.


Oven Roasted Method:  Place the scored chestnuts on a piece of tinfoil, add a small amount of water, and wrap to form a packet.  Place the packet on a baking sheet and roast in a 350 degree oven for 30 minutes.

Chestnuts ready to roast

Grilled Method:  Place the scored chestnuts in a grill basket and grill over a 400 degree grill for 20 minutes.  Shake the basket every five minutes to ensure that the nuts cook evenly and none of them scorch.  You can also place the nuts directly on the grill but you will then need to use tongs to turn the nuts.

Chestnuts on the grill

Broiled Method:  Place the scored chestnuts on a baking sheet and broil under high heat for 10 minutes.

You will know the chestnuts are cooked when the nuts are fragrant and the shells split open.  Once they are cool enough to handle, peel the shells and the inner skin from the nut.

So which method did I prefer?  By far, the broiled nuts were the easiest to shell.  The grilled method worked well too but for some reason I found the roasted nuts to be extremely difficult to shell.  From now on if I can't buy my chestnuts from a street vendor I'll be cooking mine at home under the broiler.

The payoff

Try your chestnuts in the following recipes:

Fine Cooking's Chestnut Soup with Crisp Prosciutto
Saveur's Chestnut Pound Cake
Williams-Sonoma's Pear, Chestnut, and Sage Dressing 
Williams-Sonoma's Roasted Brussels Sprouts with Bacon and Chestnuts

Thursday, November 15, 2012

Real Men Do Eat Quiche

Long days often make putting dinner on the table in a timely manner difficult, if not impossible.  A family can only eat so many pasta with sauce and grilled sausage meals (this is our old standby when I don't have the energy to make anything else).  Fortunately, quiche is always at hit in my house.  If you have the ingredients on hand--and all you really need are the kitchen staples of milk, eggs, and cheese-- everything else can be improvised and dinner can be in the oven in a matter of minutes.  I throw in whatever vegetables and meats I have available; sometimes it is ham or bacon or no meats at all.  As with most things, everything tastes better with bacon so this tends to be my most common add-in which helps to keep household interest up.

Aside from the actually baking of the quiche, which is totally hands off, the most time consuming aspect of the meal is the crust.  Sometimes I make my own following the simple three ingredient recipe of flour, butter, and water.  Purists may cringe, but more often than not I use a pre-made refrigerated crust.  It makes the whole process so much easier and faster.  If the goal is to quickly put a balanced meal on the table this is the way to go.  Throw together a simple green salad while the quiche is baking and you'll be all set.


BACON AND TOMATO QUICHE

1 deep dish pie crust
8-10 slices bacon
1 1/2 cups shredded swiss cheese (or a cheese of your choosing)
2 medium ripe tomatoes
1 1/2 cups milk- low-fat or whole
5 eggs
2 tablespoons all purpose flour
pinch dried mustard powder
1/2 teaspoon dried thyme
salt and pepper to taste
Paprika


1)  Preheat the oven to 375 degrees.

2) Prepare the crust of your choice.  Roll out the crust to fit a 10 inch deep dish pie crust.


3)  Shred the cheese and spread over the bottom of the pie crust.  


4)  Dice the bacon into 1/4 inch pieces.  Place in a large saute pan and cook over medium heat until
      browned and crisp, approximately 10-12 minutes.  Using a slotted spoon transfer the cooked bacon
      to a paper towel covered plate and drain.  Sprinkle the cooked bacon over the top of the cheese.


5)  Slice the tomatoes and place over the top of the bacon, arranging in a manner that will facilitate the
      even slicing of the cooked quiche.


6)  Combine the milk, eggs, flour, dried mustard, thyme, and salt and pepper in a large bowl.  Using a
     stick blend blend the mixture until smooth and the flour is thoroughly incorporated into the liquids.
     Pour the custard over the top of the tomatoes.  Sprinkle with paprika.


7)  Bake in the preheated oven for 40 to 45 minutes until a cake tester inserted into the center of the
     quiche is clean.  Remove from oven and let sit for 10 minutes before slicing.


Served with a green salad this makes a perfect light dinner.  The quiche is even better the next day served either cold or at room temperature.

Sunday, November 11, 2012

Jamming With Bacon

The old adage that everything is better with bacon holds true.  In my quest for new bacon related recipes I stumbled upon this one from King Arthur Flour.  Because it is made in a crock pot, the hands on time for this dish is minimal and your entire house will be filled with the sweet and salty aroma of this jam before you are done.  I was initially taken aback by the ingredients, which individually I love but I just couldn't fathom being put together as a single dish (maple syrup mixed with coffee???), but the results surprised me........after all everything is better with bacon.  Whether served on bread slices and paired with a salad for a light dinner or paired with bread and goat cheese as part of a buffet table, this jam is a hit.

Not having boiled cider on hand, and being unable to have it shipped to me, I improvised by making a reduction of apple juice cooked with a whole cinnamon stick and five whole cloves.  The result isn't quite the same but the resulting syrup seemed to do the trick.


BACON JAM

1 1/2 pounds bacon
2 medium onions, peeled and thinly sliced
3 cloves garlic
1/4 cup cider vinegar
1/2 cup dark brown sugar
1/4 cup maple syrup
1/4 cup boiled cider
3/4 cup strong brewed coffee
2 dried bay leaves
Salt and pepper to taste

1)  Slice the bacon into 1" slices and cook in a large skillet until well browned.  Drain the fat and reserve the bacon.


2)  Place the cooked bacon and all other ingredients into a 2 quart or larger crock pot.  Cover and cook  on high for 3 to 4 hours.


3)  Remove the cooked jam from the crock pot, remove the bay leaves, and carefully transfer to a food processor or blender.  (I used a bowl and my trusty stick blender).  Pulse until the consistency is to your liking, a soft, spreadable jam.  You can leave the bacon in larger bits or pulse until very small, your choice.

4)  If you find the jam too liquid for your taste, transfer to a small saucepan and cook over medium heat until the liquid has evaporated and the jam is thick and syrupy.  Adjust the seasonings and serve warm.

5)  Store airtight in the refrigerator for up to 2 weeks.  Warm in the microwave before serving.

Yield:  2 cups

Thursday, November 8, 2012

Mediterranean Vegetable Bread


Like so many cooks I find recipes that inspire me and then tweak them to my own liking.  I'm also an avid reader of cooking blogs and my favorite, Adventures of the Yankee Kitchen Ninja, regularly posts recipes that intrigue and inspire me.  (It doesn't hurt that this blog is also written by a fellow Mount Holyoke alum).

The Kitchen Ninja posted this recipe as a savory olive bread after having tweaked it herself from Susan Hermann Loomis, author of On Rue Tatin.  See, this is how recipes evolve!  The Kitchen Ninja's recipe called for 3 1/2 cups of fresh spinach.  Try as I might, I could not find any fresh spinach, or any suitable substitute in Albania in November.  I used a small amount of frozen spinach instead and added in shredded carrots for bulk.  I also added fresh chopped basil.  The only jarred roasted red peppers I had in my pantry were marinated so I used those instead of the plain variety.  The result?  A tangy vegetable infused bread the blended together my favorite flavors of the Mediterranean.


MEDITERRANEAN VEGETABLE BREAD

1 1/2 cups all purpose flour
2 teaspoons baking powder
1/2 teaspoon salt
6 eggs
1/4 cup olive oil
2 garlic cloves,  minced
1 cup frozen spinach, chopped and squeezed dry with leaves separated
2 cups shredded carrots
1/2 cup chopped basil leaves
1 cup marinated roasted red peppers, chopped
1 heaping cup black olives, chopped
1/2 teaspoon black pepper
1/2 cup shredded Swiss cheese

1)  Preheat oven to 400 degrees F / 200 degrees C.  Grease a loaf pan and set aside.

2)  Whisk together the flour, baking powder, and salt in a small bowl and set aside.

3)  In another large bowl, beat the eggs; whisk in the olive oil, then stir in the garlic, spinach, carrots,
      and basil.


4)  Add the flour  mixture and stir until well combined.  Fold in the red peppers, olives,
      black pepper, and cheese.

4)  Pour the batter into the prepared loaf pan and bake for 45 minutes, until the bread is browned and a
     skewer inserted into the middle comes out clean.  Let cool in the pan for about 10 minutes then
     continue cooling on a wire rack.


Monday, November 5, 2012

Pumpkin Donuts

Cooking with Mamma
In celebration of fall, and in preparation of a postponed Embassy-wide Halloween celebration, Sidney and I made homemade doughnuts this weekend.  I dipped into my precious stash of imported canned pumpkin puree and broke out my new mini doughnut pans in order to make this super fast and easy pumpkin cake doughnut recipe from King Arthur Flour.

If you don't have a doughnut mold- and how many of us really do- you can use a muffin pan which would probably be easier to fill.  The results will be the same; a light and richly flavored pumpkin morsel to help celebrate this autumn season.


BAKED PUMPKIN CAKE DOUGHNUTS

DOUGHNUTS

1/2 cup vegetable oil
3 large eggs
1 1/2 cups granulated sugar
1 1/2 cups pumpkin puree
3/4 teaspoon ground cinnamon
1/4 teaspoon ground nutmeg
1/4 teaspoon ground ginger
1 1/2 teaspoons salt
1 1/2 teaspoons baking powder
1 3/4 cups + 2 tablespoons all purpose flour


COATING

3 tablespoons granulated sugar
1 teaspoon ground cinnamon


1)  Preheat the oven to 350 degrees.  Lightly grease two doughnut pans.  (I used miniature ones and
      reduced my baking time but standard sized ones or even muffin pans will also work).

2)  Beat together the oil, eggs sugar, pumpkin, spices, salt, and baking powder until smooth.


3)  Add the flour, stirring just until smooth.


4)  Fill the wells of the doughnut pans about 3/4 full.  Bake for 10 minutes for miniature doughnuts, 15
      minutes for standard sized ones, and 25 minutes for standard sized muffins.


5)  Remove the doughnuts from the oven, and after about 5 minutes loosen their edges, and transfer
      them to a wire rack to cool.  Repeat the baking process until all the batter has been used.

6)  Combine the sugar and cinnamon in a pie plate.  While the doughnuts are still warm, roll the
     doughnuts in the cinnamon-sugar mixture.


7)  Cool completely, and wrap airtight; store at room temperature for several days.


Saturday, November 3, 2012

Double Corn and Thyme Cornbread

The only cornbread my family
will eat
I love to serve a good cornbread as an accompaniment to a bowl of chili but have never been able to find one that is moist enough to satisfy my finicky boys (yes, both of them).  This one, from Joanne Chang's Flour Cookbook, turned out to be a winner.  (In fact, every recipe I have made from this book has been a success.  As an added bonus, ingredients are listed in both standard American measurements as well as by weight which saves those of us in Europe from having to do those painful conversions).

The recipe called for creme fraiche but lacking both the creme fraiche and my usual substitute of sour cream, I made my own substitute of 7/8 cup of buttermilk (re-hydrated buttermilk powder from King Arthur Flour since we also don't have fresh buttermilk in Albania) and 3 tablespoons of melted butter.  This substitute seemed to do the trick but I am looking forward to making this again using creme fraiche.  I think that will take the bread from very good to outstanding.   The recipe also called for baking the bread in a 9-by-13 inch loaf pan. Preferring to serve the bread in wedges, I used a 10-inch round cake pan instead and this worked out well.


DOUBLE-CORN AND THYME CORN BREAD

1 cup (200 grams) coarse yellow cornmeal
2 1/2 cups (350 grams) unbleached all-purpose flour
2 teaspoons baking powder
1 teaspoon baking soda
1 1/4 teaspoons kosher salt
1/4 cup (56 grams) unsalted butter, melted and cooled
1/4 cup (50 grams) canola oil
1/4 cup (55 grams) packed light brown sugar
2 eggs
1 cup (240 grams) milk
3/4 cup (180 grams) creme fraiche
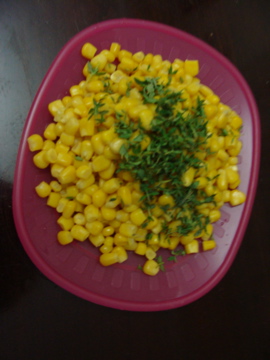
1 cup (160 grams) fresh or frozen corn kernels
1 tablespoon chopped fresh thyme


1)  Position a rack in the center of the oven, and heat the oven to 350 degrees F / 180 degrees C.  Butter
      a cake pan.

2)  In a large bowl, stir together the cornmeal, flour, baking powder, baking soda, and salt until
      combined.  In a medium bowl, whisk together the melted butter, oil, and brown sugar until a thick
      slurry forms.  Whisk in the eggs, one at a time, and then whisk in the milk and creme fraiche.

Dry ingredients

3)  Pour the egg-sugar mixture into the cornmeal mixture, and then, using a rubber spatula, fold together
      until all of the cornmeal is completely incorporated.

Egg mixture

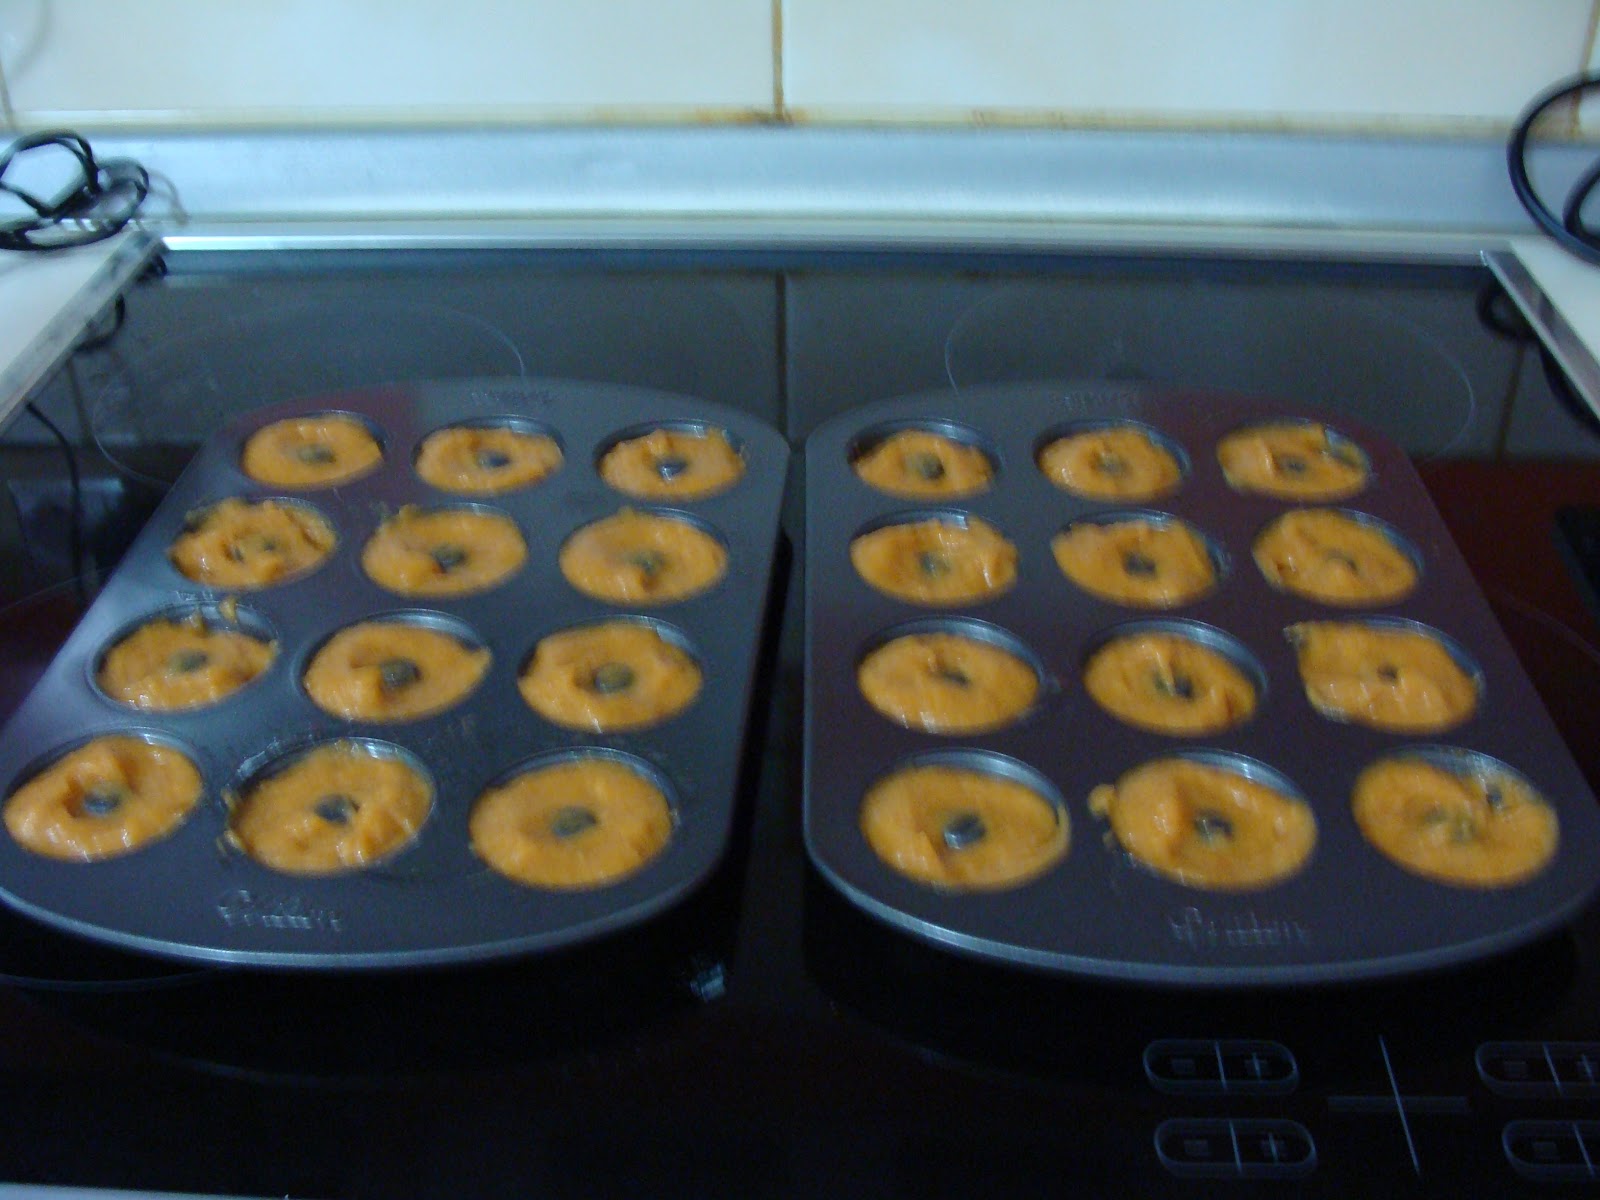
4)   Fold in the corn kernels and the thyme until they are evenly distributed throughout the batter.  The batter will be thick and pasty.  Spread the batter evenly into the prepared pan.

Corn and thyme
Ready for the oven

4)  Bake for 40-50 minutes (mine baked for 45 minutes in the round pan), or until the top is a light
     golden brown and the center springs back when you poke it in the middle with a fingertip.  Let cool
     completely in the pan on a wire rack, then cut into 12 wedges.

5)  The corn bread can be stored, tightly wrapped in plastic wrap, at room temperature for up to 2 days
      or in the freezer for up to 2 weeks.  If frozen, thaw at room temperature for 3 or 4 hours and refresh
      in a 300 degree F /150 degree C oven for 8 minutes.